DIY - How to diagnose dampness - Free Technical Help - 01626 872886 - discuss your building problem with a Qualified Dampness Expert (C.R.D.S.)
Quick DIY Master Class in Dampness and Condensation - become your own Expert in 1 hour!
Buy our "Dampness in Buildings" reprinted book by the great expert Graham Coleman. A great read, short and to the point.
Click here to buy the reprint.
Tools for Analysing damp, to be found on our Dampness-info Web Site
A 'damp meter', surface thermometer and memory hygrometer are useful tools for this diagnosis - if not available, use the back of your hand to assess the relative dampness of one affected area to another unaffected area. (Also see our main Dampness Site www.dampness-info.co.uk )
See our Surveying Shop for more useful tools.
How to Analyse your Damp - check damp walls and floors for yourself using this quick summary
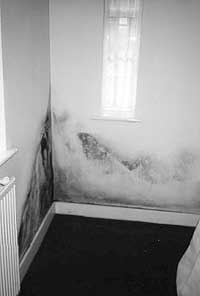
1. Can you see any 'black spot' mold?
Yes = Condensation must have formed at some time. Check ventilation and heating - redecorate with our Anti Mould Cleaner, Anti Mold Emulsion or Anti Mould Additives in the paint or wallpaper paste.
If you have a cavity wall (check the brickwork pattern on the outside - lengthwise only bricks indicate a cavity construction) you might have some dirty wall ties, giving rise to 'cold spots'. These can be cleaned by taking out individual bricks.
If you have a solid wall fitting our Air Gap Membrane on the inside, plus Insulation and Plasterboard, will really help to warm up the wall and save energy. It reduces the risk of Condensation and Mold - decorate using Anti Mold Emulsion or Anti Mould Additives in the paint or wallpaper paste.
No = Probably not a condensation problem, although 'salts' from rising dampness can kill off mould, masking part of the problem - is their any patchy mould? Try using an illuminated map reading magnifier to view the wall surface.
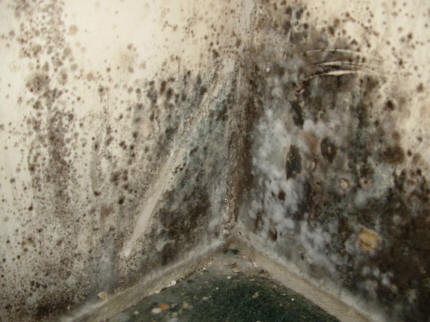
Severe examples of 'Black Spot' Mould - it is often milder than this.
Notice the white 'salts' killing off the mold in some areas.
2. Can you see a 'tide' line or damp stain above the skirting board up to a height of about 6" - 18" (150mm - 450mm). Are the skirting boards damp or rotten?
Yes = may be rising dampness - check exterior ground levels are at least 6 inches (150mm) below the Damp Proof Course level, check that the wall plaster does not 'bridge' the DPC or go down to a solid floor.
Install a DPC and Replaster to our Specification - use Renderproof Waterproofing Additive. Or, line the bare wall with our Air Gap Membrane on the inside, plus Insulation and Plasterboard. This will really help to warm up the wall and save energy. It reduces the risk of Condensation and Mold - decorate using Anti Mold Emulsion or Anti Mould Additives in the paint or wallpaper paste.
Also, check your neighboring properties - are their floor levels above yours? Have they replaced any timber floors with concrete of filled in a basement? Councils often raise the level of the roads and pavements over the years, people often raise the level of their gardens, or build things (like steps) against the house wall.
No = if the damp is higher up the wall or patchy, more likely to be penetrating dampness - check the exterior walls for defects, check gutters and downpipes, check the pointing in the joints, treat with Ultra Proof Waterproofer.
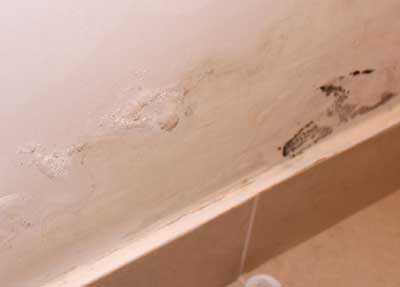
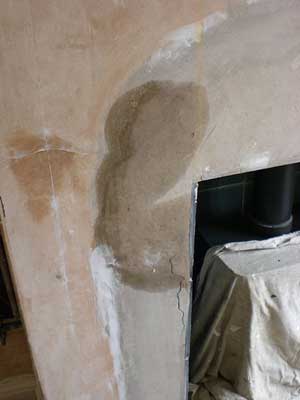
Rising Damp causing plaster and paint to bubble
3. Can you see fluffy white 'salts' on the wall or are they crunchy beneath flaking paint or lifting wallpaper?
Yes = you probably have penetrating dampness - the 'salts' indicate that wetting has occurred and drying out is taking place - treat with Salt Neutraliser, if the plaster is not too damaged.
Check the exterior walls for defects, check gutters and downpipes, check the pointing in the joints, treat with Ultra Proof Waterproofer.
No = your dampness may be due to 'hygroscopic salts' deposited in the wall from chimney deposits (after burning coal or wood), or from a previous use of the building (e.g. coal shed, animal food store, butchers shop). Treat with Salt Neutraliser and replaster to our 'tanking' specification using BondAcryl. Or, line the bare wall with our Air Gap Membrane on the inside, plus Insulation and Plasterboard. This will prevent any future penetration and avoid your decorations ever being damaged again.
In severe cases it is best to use the Mesh Membrane wall lining system, rather than 'tank' or replaster - chimney salts can burn back through even the best render backing coats sometimes.
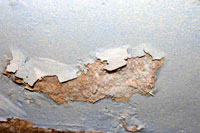
'Salts' bursting through plaster and paint.
4. Have you got isolated damp patches that come and go, particularly on or next to chimney breasts?
Yes = you may have 'hygroscopic' (means "attracts moisture from the air") salts and chemicals from burning wood and coal, which have bled through the plaster. Sometimes they show up as brown or yellow stains, particularly in wallpaper. Treat with Salt Neutraliser and replaster to our 'tanking' specification using BondAcryl.
In severe cases it is best to use the Mesh Membrane wall lining system, rather than 'tank' or replaster - chimney salts can burn back through even the best render backing coats sometimes.
No = map out the areas of dampness and look for the highest concentration - does this area connect to a feature - like a radiator, boiler or sewerage pipe cover? Have any recent changes been made to the building?
Damp patches, which have pushed off the paint.
5. None of the above - are the walls and floor visibly damp?
Yes = you may have a water leak topping up your soil under your property - follow the water leak testing routine - click here.
No = we give up - call us on 01626 872886 for a chat and we'll see if we can help.
Testing to find the water source
A. Ask your local water Supplier to test your Water Mains pipe for leaks. Particularly ask them to test your neighbors supplies on both sides: if you live on a hill with properties above you check all those on the high side of your house. This service should be free of charge.
B. If you have liquid water in your building (on a solid floor, or in a basement) ask the Water Supplier for an analysis - this will tell you where the water comes from - mains, sewerage or spring/ground water.
C. Test your own drains - test the foul water by finding the man hole cover, lifting it and running a tap to see which hole your water flows from. Block this hole with a rubber bung (available from us - check to see if you have a 4 inch or 6 inch pipe). Then fill up a ground floor sink or loo with water and mark the level. Leave over night, ensuring that no one flushes the toliets or uses the sinks or showers - if not at the same level next day you need a Drains Company with a camera to investigate. Don't forget to remove the bung!
D. Test the surface water drains - place a Dye Bag or granules of drains testing dye (available from us) into the drain and fill up with water. Using a torch, at night, look for signs of the coloured dye - it glows in the dark.
WARNING - incorrect replastering is the largest cause of repair failure in damp buildings
Replastering old walls - you may only have contaminated plaster and the original source of the moisture may have been successfully tackled (e.g. new damp proof course, water leak solved), but without a 'salt' and moisture resistant sand and cement Render backing your new Plaster will be wrecked in weeks.
Either use this Specification or use our Air Gap Membrane, which you can plaster with a Bonding, lightweight Gypsum plaster
Many, many Builders and Plasterers do not use the approved method of replastering and in most cases the symptoms, of 'salt' contamination, will reappear if they use modern lightweight plasters, like 'bonding' or 'browning'.
Follow this Specification to the letter and watch the Plasterer to ensure that no Washing Up Liquid or Browning Plaster are added to the mix.
Replastering Specification - and the thinking behind it.
1. Hack off all old plaster to at least 300mm clear of all signs of damp or salt and at least 1 metre above ground floor level - use a 'damp meter' to test the walls and remove plaster at least 300mm above the highest level that readings can be obtained.
Reason - This is to ensure that the residual 'salts' do not climb above the new plaster in the future.
2. Brush the walls to remove all plaster residue, particularly around angle beads.
Reason - old plaster will have 'salt' in it and will cause damp spots to appear in time. Old Lime or Gypsum plaster residue will react badly with the new sand and cement render, causing 'salting'. Do NOT allow the Plasterer to fix new Angle Beads (at corners) with Plaster of any kind - only use galvanized clout nails or Gripfill type adhesive.
3. Repair any holes or poor joints with sand and cement (4:1) using washed, sharp (means slightly gritty) plastering sand (sometimes called screeding or rendering sand). Do not use fine, unwashed sands.
Reason - fine, unwashed sands often contain salt and the fine particles are too numerous to find enough cement particles to bond together tightly - these two problems make for a weak render, prone to the easy passage of 'salts'.
4. Special Note - walls made with non-porous stone or brick, like granite or blue brick, will require an adhesive to help stick the render coat to the wall - use BondAcryl concentrate)
Reason - normal renders and plasters stick to the wall by suction - the surfaces need to absorb some water. Without this suction the render or plaster will not grab the wall and may become loose and hollow as it dries.
5. Damp the walls lightly (to reduce 'suction', which can cause excessive drying and cracking) and apply a thin coat (maximum 1/2 inch, 12.5mm) of render consisting of 3 parts sand - dry, washed, sharp (means slightly gritty) plastering sand (sometimes called screeding or rendering sand) with 1 part of fresh (free flowing - no lumps) Portland Cement.
Reason - thick coats are more likely to slump down the wall during application and crack during drying out.
6. Scratch the render surface liberally all over with a nail board, trowel, metal float or similar object.
Reason - without these scratches the natural drying shrinkage will cause cracking, crazing and hollowness to develop - the next coat will probably pull the first coat off as it dries.
7. Use only Renderproof water proofer/plasticiser in the water that the render is mixed with, at the rate of 1 part Renderproof to 40 parts of water. Do not use fine, unwashed or wet sands.
Reasons - Renderproof binds the sand to the cement and prevents liquid water passing through. It also makes the mix stickier (plasticising) which help to hold the render together. Wet sand weighs more than dry, so it will make your mix weak. Fine sands produce a weak, powdery render, which will not resist 'salts'. Do not allow the plasterer to add plaster (usually 'browning') or washing up liquid to the mix.
8. When the render surface is firm enough (but not bone dry, or it will need re-wetting) apply a second coat to exactly the same specification - if further coats will be needed to reach the desired thickness don't forget to scratch liberally. In hot weather spray the render surface with water to slow the drying process.
Reasons - excessive drying out increases the suction and can prevent one coat sticking to another. Rapid drying always increases shrinkage, which gives rise to cracking of the render or finish plaster.
9. Whilst still damp (or re-wet again) apply a skim coat of Multi-Finish or Board Finish. Do not polish or add water.
Reason - polishing the plaster skim finish will produce a shiny, glazed finish which looks good, but is prone to condensation, black mould growth and poor drying.
10.. Delay any decoration for at least one month and then only apply a thin coat of breathable emulsion paint, not a heavy vinyl. Our Replastering Paint is the best option because it breathes and allows the wall to dry out naturally. Do not repaint or wallpaper for at least three months.
Reason - the paint or paper will fall off the wall due to the water vapour that will be trapped underneath in the new render.
Membrane | Privacy Policy | Returns Policy | Contact |
Property Repair Systems
T: 01626 872886
Use any of our Shopping Pages to place goods in your Shopping Cart - they all use the same Shopping Cart system.

Click to view your Shopping Cart
or continue shopping by clicking on our Membrane Shop link below.
OUR MEMBRANE SHOPPING PAGE
Other Property Repair Systems Sites:
www.epoxy-info.co.uk - epoxy resins for repairing wood, concrete, brick and stone
www.fire-door-paint.co.uk - upgrade doors to 30 minutes fire resistance
www.joist-repair.co.uk - how to quickly repair joists and beams of any size
www.propertyrepairsystems.co.uk - our Home Site
www.steel-fire-paint.co.uk - treat steel with Intumescent Paint to provide fire protection
www.timber.org.uk - systems of repair, with step by step methods
www.timber-repair.co.uk - how to repair timber beams
Site written by: David Moore
David Moore, B.A. (Hons.), C.T.I.S., C.R.D.S. Technical Author
Google+